Showing posts with label nginx. Show all posts

Oct 16, 2022

Manually Install and configure Nginx with Multipass

Found a great tutorial site at Ubuntu.

Let me follow the tutorial to setup a Nginx web server with multipass.

$ multipass launch --name nginxweb -c 2 -m 2G

$ multipass shell nginxweb

ubuntu@nginxweb:~$ sudo apt update
ubuntu@nginxweb:~$ sudo apt install nginx 

ubuntu@nginxweb:~$ cd /var/www
ubuntu@nginxweb:~$ sudo mkdir tutorial
ubuntu@nginxweb:~$ cd tutorial
ubuntu@nginxweb:~$ sudo "${EDITOR:-vi}" index.html

Insert the following content and save index.html:

<!doctype html>
<html>
<head>
    <meta charset="utf-8">
    <title>Hello, Nginx!</title>
</head>
<body>
    <h1>Hello, Nginx!</h1>
    <p>We have just configured our Nginx web server on Ubuntu Server!</p>
</body>
</html>

Next, configure Nginx web to start a new web instance at port 81.

ubuntu@nginxweb:~$ cd /etc/nginx/sites-enabled
ubuntu@nginxweb:~$ sudo "${EDITOR:-vi}" tutorial

Again, insert the following content and save the tutorial file:

server {
       listen 81;
       listen [::]:81;

       server_name example.ubuntu.com;

       root /var/www/tutorial;
       index index.html;

       location / {
               try_files $uri $uri/ =404;
       }
}

Last, restart Nginx, and capture the IP address and make sure everything is working.

ubuntu@nginxweb:~$ sudo service nginx restart

ubuntu@nginxweb:~$ ip a 

Open the browser (at host) and point to http://<ip>:81/ and http://<ip>/

(All the works complete within 4 min at my laptop)


Link:
Sep 30, 2022

Customized a Node.js App in Multipass

This is a short tutorial to:

  • Create an Ubuntu VM with cloud-init file
  • Install a running Node.js app with a Nginx as the front-end proxy


Cloud-init is a widely used approach to customize a Linux VM as it boots for the first time. It can be used to install packages and write files, or to configure users and security hardening. 

Cloud-init also works across distributions which means it automatically uses the native package management tool for the distro you select.

#cloud-config
package_upgrade: true
packages:
  - nginx
  - nodejs
  - npm
write_files:
  - owner: www-data:www-data
    path: /etc/nginx/sites-available/default
    content: |
      server {
        listen 80;
        location / {
          proxy_pass http://localhost:3000;
          proxy_http_version 1.1;
          proxy_set_header Upgrade $http_upgrade;
          proxy_set_header Connection keep-alive;
          proxy_set_header Host $host;
          proxy_cache_bypass $http_upgrade;
        }
      }
  - owner: webadm:webadm
    path: /home/webadm/myapp/index.js
    content: |
      var express = require('express')
      var app = express()
      var os = require('os');
      app.get('/', function (req, res) {
        res.send('Hello World from host ' + os.hostname() + '!')
      })
      app.listen(3000, function () {
        console.log('Hello world app listening on port 3000!')
      })
runcmd:
  - service nginx restart
  - cd "/home/webadm/myapp"
  - npm init
  - npm install express -y
  - nodejs index.js


Save the YAML as webadmin.yaml and then start creating the VM with Multipass as below:

multipass -n nodejs3k --cloud-init webadmin.yaml

multipass info nodejs3k

Last, open the URL to http://nodejs3k_ip_addr with your browser.


Links:

Aug 19, 2022

Redirect IP Address to Domain Name in NGINX

Here's the instruction from Günter Scholtz on how to redirect IP address to domain name in Nginx and Apache.

Setting up a Default Route in Nginx

Method 1. Return a 301 redirect for requests made to IP.

server {
  listen 80;
  listen [::]:80;
  server_name 192.168.1.80;
 
  add_header X-Frame-Options "SAMEORIGIN";

  return 301 https://www.example.com$request_uri;
}

 Method 2. Return a 301 redirect which only no other rule matches. ('server_name _' means non-matches server name)

 server {
  listen 80 default_server;
  listen [::]:80 default_server;
  server_name _;

  return 301 https://www.example.com$request_uri;
}


Setting up a Default Route in Apache

Method 1. Redirect IP requests to domain name by adding a rewrite rule that matches the IP.

RewriteEngine On
RewriteBase /
RewriteCond %{HTTP_HOST} ^192.168.1.80$
RewriteRule ^(.*)$ http://www.example.com/$1 [L,R=301]

Method 2. Redirect all other request (with no subdomains).

RewriteEngine on
RewriteCond %{SERVER_NAME} !=www.example.com
RewriteRule ^ https://www.example.com%{REQUEST_URI} [END,NE,R=301]


Links:

Jul 7, 2022

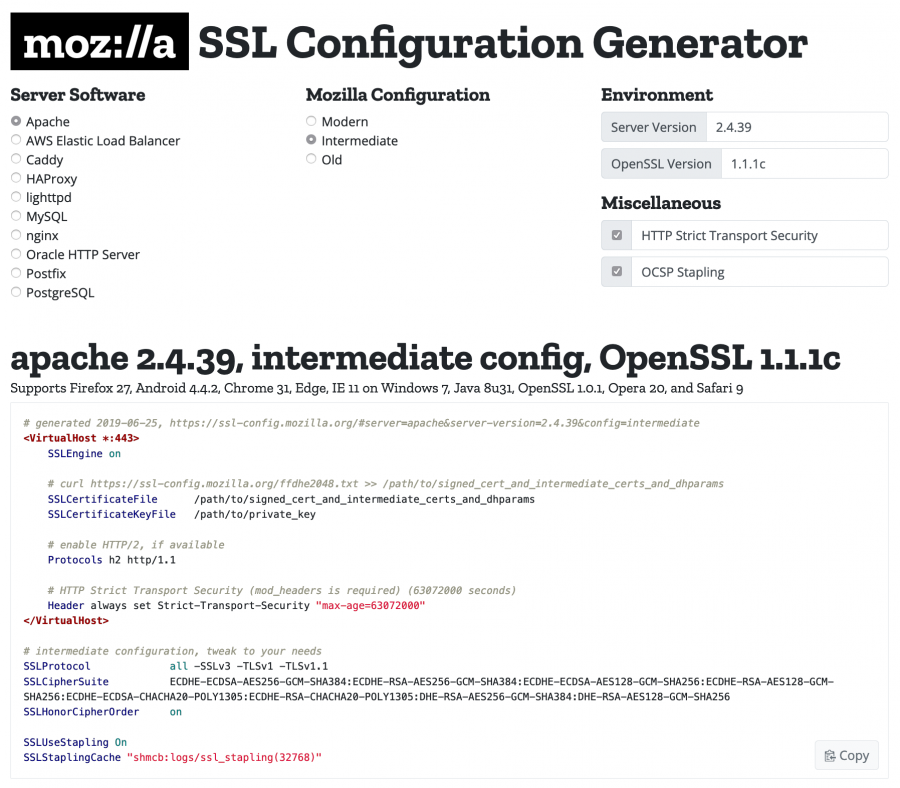
SSL Configuration Generator

There is a Mozilla websites that maintains a reference guide for navigating the TLS landscape, as well as a configuration generator to assist system administrators.

Mozilla maintains three (3) recommended confiruations for servers using TLS.

  • Modern - modern clients that support TLS 1.3, with no need for backwards compatibility
  • Intermediate - recommended confiruation for a general-purpose server
  • Old - services accessed by very old clients or libraries, such as Internet Explorer 8 (windows XP), Java 6, or Open SSL 0.9.8


Mozilla SSL Configuration Generator

Links:


Oct 21, 2021

Install ModSecurity for Nginx on Ubuntu

WebApp security can be a huge challenge especially with the prevalence of malicious tools such as rootkits, scanners, bots, and other malware. Although getting breached may seem a matter of when if not if, it is prudent to implement some decent security measures to safeguard your web applications.

One of the tools that can provide a decent level of security against attacks is called ModSecurity. This is a free and open-source Web Application Firewall (WAF) that can protects your web applications from a vast array of layer 7 attacks such as cross-site scripting (XSS), SQL injection, session hijacking, and many more.

In this guide, it show how to install and configure ModSecurity to work with Nginx on Ubuntu from source.

Steps:

  1. Install dependencies
  2. Install latest Nginx version
  3. Download Nginx source package
  4. Install the Libmodsecurity3 library
  5. Download and compile ModSecurity v3 Nginx Connector
  6. Load the ModSecurity Nginx Connector module
  7. Download OWASP corerule set
  8. Testing out ModSecurity
ModSecurity

Links: